Loading... Please wait...

 Canada
Bombora Roarockit Teacher’s Drop Deck Kit


Product Description:
The Bombora Roarockit Drop Deck involves separate pressings, with some hand sanding in between. The finished board will have wheel wells and a refined drop deck shape created in collaboration with local board builder, Rob De Freitas. Use this build as part of your credit-worthy quality education program, from STEM to construction technology, to physics of vacuum, to health education, to art & design.
Final Deck Dimensions:
36.5"L x 9.5"W
Wheel base: 29.25”
Concave: 0.5”
Rocker: 0.25”
Drop: 0.3”
Final Deck Dimensions:
36.5"L x 9.5"W
Wheel base: 29.25”
Concave: 0.5”
Rocker: 0.25”
Drop: 0.3”
Bombora Roarockit Teacher’s Drop Deck Kit

 Calculated at checkout


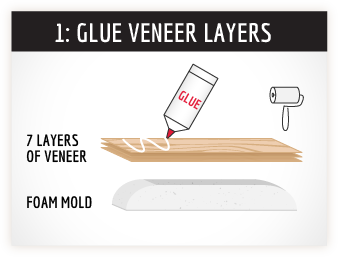
Bombora Drop Deck Teacher's Kit contains:
- 8-layers of Canadian maple per board
- includes 2 face, 4 long grain core and 2 cross grain sheets per board
- 3-dimensionally shaped foam mold
- mold backer sheet
- waxed paper sheet
- glue, roller and measuring cup
- edging tool and sandpaper
- Mini-curriculum and illustrated drop deck instructions
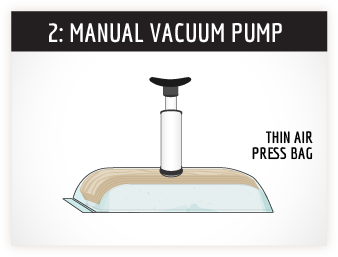
and a Thin Air Press Kit
- 14 x 47” heavy duty vinyl vacuum bag with one-way valve attached
- manual vacuum Super Pump
- breather netting
- extra sealing tape
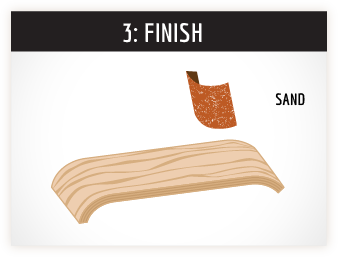
The instructions for this building this board are slightly different than our other kits and requires a higher degree of expertise. Follow the Drop Deck instructions included to glue up and shape the upper and lower sections of the board, then laminate them together after sanding the wheel wells smooth.
Use the guide holes on the bottom side to drill the truck holes through, using a 3/16” drill bit.
Always wear a helmet when riding!
The foam mold, Thin Air Press Bag and pump, edging tool and breather netting are designed to be used for many, many builds.
Keep all your reusable kit parts in good working order by following the maintenance tips included with the kit.
Q: Who is Rob Defreitas / Bombora Boards?
A: Check him out here!
Q: Is this kit reusable?
A: Yes. Every thing but the veneer and glue are reusable
Q: What if the TAP bag or valve leaks?
A: 99.9% of the time, the seal is not closed up properly. Dust and debris can prevent the top cap of the valve to seal, rinse cap with water. For more in-depth details, see the TAP kit FAQ’s page.
Q: My school has budget issues, how can we afford this?
A: Create an entrepreneurial environment. Building multiple boards can lead to creative ways of generating funds for a self-sustaining program. Hold an auction, find sponsors for boards, host an art show, all have been done with great success. See the Get Inspired area here to see what other teachers are doing.
Q: What age is this recommended for?
A: We recommend no younger that 10 years old.
Q: How can I justify building boards in the classroom?
A: Teachers around the world have used this program as an incentive or for fun. They also use building skateboards as a focus to help students achieve their high-school credits: math and science, woodworking, environmental studies, art and design, business and entrepreneurship, teamwork, leadership, mentorship and outreach.
Q: Can I get more veneer, glue and other supplies?
A: For schools and groups, we have an online or downloadable order form where your school or institution can order bulk supplies by issuing us a signed Purchase Order.
Q: Will stuff last if I don’t use it right away?
A: Veneer will absorb and lose moisture, so keep it sealed in plastic (or the carton it arrived in) but away from any heat sources. Lay it flat to prevent warping. Prevent the glue from freezing.
Q: What do I do if the veneer breaks or splits?
A: Veneer is fragile until laminated, and it is common to split or snap (especially the cross grains). A stripe of glue and some masking tape to hold it until it dries will fix broken or split sheets. See video how-to-fix.
Q: Can this kit be used to make a snowboard or wake skates?
A: The size of the bag determines how large a project you can fit into it. As the seams of the 14 x 47” TAP bag included here cannot be stretched open while pressing, you are limited to smaller projects. See our larger bag sizes for one that suits your project.
Q: Can the Thin Air Press make other things?
A: Yes! Furniture parts, marquetry projects, archery bows, sculptural pieces, really any bent or flat laminations work well in the Thin Air Press.
Q: What else do I need to complete this project?
A: A moisture protector is recommended (sponge on water-based outdoor clear coat) to seal all surfaces, especially your edges and before applying any graphics.
Included in the curriculum is a list of suggestions for setting up a classroom or other location with useful extras for teaching in a class environment.
Q: What if my school has a no-skateboarding policy?
A: The Roarockit Kits are all about building just the laminated wood part of a skateboard. As students build their very own board and can take enormous pride in creating custom graphics the boards very often are hung on a wall rather than being ridden right away. This provides the school the option to still enforce their policy, as the boards will not be actively used. Roarockit does not provide the wheels and trucks.
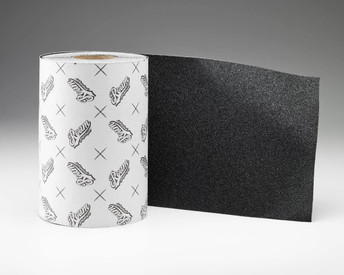
Q: Where do I get the wheels and trucks?
A: Roarockit supplies grip tape, but not hardware. We suggest involving your community by contacting a local skateboard shop (students are a great source for this information) and ask them to even come to speak to the class. Topics can be about safety, tuning, products and riding skills.
Related Products
-
 Lil'Rockit Teacher's Kit $201.95
 -
 Grip Tape Full Roll 11" $269.95
 -