Loading... Please wait...

 Canada


- Home
- Woodworking
- TUG Vacuum Gauge
TUG Vacuum Gauge


Product Description:
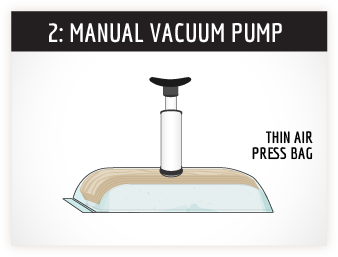
Fitted with two Quick-Lock connectors, this vacuum gauge connects in line with the TUG External valve assembly and Thin Air Press Bag fitted with elbow valve.
TUG Vacuum Gauge


The TUG Vacuum Gauge contains:
- a vacuum gauge with two Quick-Lock connectors
- 1/4" tubing (2 ft length)
Connect your TUG vacuum gauge in-line (between your TUG external valve and your Thin Air Press bag) to both Quick-Lock connectors using the 1/4" tubing. Position the breather netting and seal the bag. Place the manual pump onto the grey valve and pump the air out.
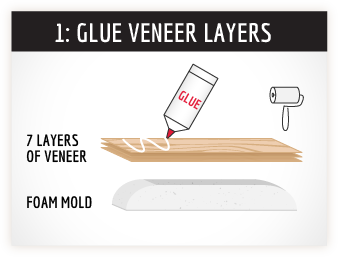
Before you glue up your veneers, a dry run is highly recommended!
Click these links for tutorials on:
Replacing the Sealing Tape Tips Part 1:
Replacing the Sealing Tape Tips Part 2:
Click here for tips on keeping your TAP gear well maintained
Tips are included on the maintenance sheet included with the kit.
Keep your TAP bag working efficiently by keeping the sealing tape clean, replacing the paper strip back after each use.
If you suspect leaks in the vinyl, inspect it regularly (see video) and use clear packing tape to stop up any possible leaks.
Maintain the pump with plain water, or a light spray of oil to keep the slide moving freely.
Ensure your valve has not lifted away from its base, and that the top cap is free of any sawdust, foam bits or glue.
Handle and store your TAP bag so that nothing sharp can puncture it.
Q: Where do I find out how to bend single sheets of veneer that are used in this video?
A: Click this link to see how Behrad does his technique.
Q: Is this reusable, and for how many times?
A: The kits are designed to be used many many times. With a little care and maintenance, the TAP Kits will last for years.
Q: Will the glue stick to the bag?
A: PVA glue and epoxy will not stick to the bag. Any dried glue can be loosened with fingers and either shaken or blown out with a shop vac. Do not use polyurethane glue as it will damage the vinyl and ruin the bag.
Q: How many pieces can I press at once?
A: You are limited by how fast your glue dries. If using slow-set epoxy, you have a generous amount of time to work before it starts to set. If using water-based glue such as Titebond III, you have about 7 minutes to get your project pressed before the glue dries. Dry glue will not bond together.
Q: If the TAP Bag gets a hole in it, can I fix it?
A: Clear 2” packing tape seals up any suspected punctures. Use a length of the butyl tape to fix any side seam gaps or splits.
Q: Do the valves leak?
A: While many people assume air is leaking back through the valve, they are made of cast rubber and almost never leak. The most common problem with slow leakage is the open-end seal tape. If the seal is not properly closed up (check both sides) you will lose vacuum. If the top cap of the valve is not compromised with dust and debris, the valve will not leak.
Q: Do you refund my veneer if I screw up the pressing?
A: Nope
Q; What’s a “Dry Run” and why should I do that?
A: It means to press your project in the TAP bag, without putting any glue on the veneer sheets. Stack the dry sheets of veneer over the mold, seal them into the press with the breather netting in place, and pump the air out. Check for 10 minutes to make sure the TAP bag is not leaking. This will help you become familiar with the process before you commit glue to your veneer sheets.